
How to Display Posters and Tapestries: Reading Outer Dimensions, Visible Area, and Wall Conditions
You want to display a favorite illustration in your room. Yet once you start looking for picture frames or hanging hardware, you quickly realize that knowing the merchandise size alone is not enough to make a choice. How large is the outside of the frame? Will the lettering near the edges get covered up? Is the total weight safe to hang on your wall? There are quite a few details that are helpful to know before you buy.

Using official manufacturer images and specification tables, this guide organizes what to check when choosing, displaying, and preserving paper posters and fabric tapestries. In the second half, we also look at the practical information that merchandise planners should prepare for buyers.
What an Official Photo Shows: A Slim Frame and a Wide Mat Board
Sofken’s “Photo Mat G/UV” (in Japanese) is a front-opening aluminum frame paired with a mat board and a UV-cut acrylic panel.
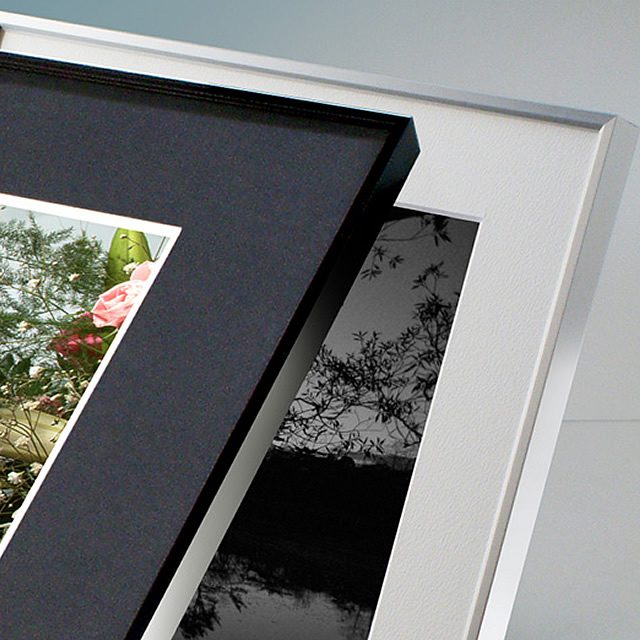
In the photo, you can see that the slim black outer frame and the wide black mat board inside it are two separate components. The white frame in the background also contains a white mat board. You can even see the beveled inner cut where the mat meets the edge of the photograph, making it clear that the border surrounding the artwork is not created by the narrow aluminum rim alone.
What matters here is knowing how far the outer frame extends and where the visible area of the artwork begins. If you pick a frame based only on the phrase “for A3,” you cannot tell whether it will fit on your wall or whether text near the margins will stay in view.
Reading Artwork Size, Outer Frame Size, and Window Opening Separately
The A3 version of this same product comes standard with a 5 mm frame width, a mat board, and a 2 mm thick UV-cut acrylic panel, listing the measurements below. Note that these figures are an example for this specific product and are not universal dimensions shared by every A3 frame.
| Spec Table Item | A3 Specification Example | What to Check Before Displaying |
|---|---|---|
| Artwork / poster size | 297 × 420 mm | Whether the dimensions of the paper itself match the frame |
| Outer dimensions of frame body | 440 × 563 mm | Whether you have enough room on the wall or shelf |
| Window opening (visible area) | 277 × 400 mm | Whether the lettering and artwork you want to show fit inside the window |
| Frame body weight | 1.37 kg | Whether the hanging hardware and mounting surface support the weight, including the item inside |
Source: Sofken official standard size table (in Japanese). The listed body weight includes the clear front panel and backing board.
The outer dimensions are larger than the artwork size because the width of the surrounding mat board and frame rim is added around the paper. Even if a bare poster would fit in a given spot, putting it into a frame may cause it to overlap an adjacent shelf or nearby merchandise. Always measure your display space based on the outer dimensions of the frame.
By contrast, the window opening (visible area) is smaller than the artwork dimensions. Check both the actual size of the paper and the area you want to keep visible so that dates, signatures, or credits printed near the edges of a poster do not get covered up. Before trimming an artwork to make it fit a frame, remember that you also have the option of looking for a frame with different specifications or choosing another display method altogether.
Beyond whether a frame includes a mat board, verify the maximum insert thickness, whether items are loaded from the back or the front, and what hanging hardware is included for each individual product. Those are practical details you cannot tell simply by comparing frame colors.
- 01Measure the paper dimensionsDo not rely on the standard size name alone; check the actual measurements and thickness of the item in hand
- 02Compare the visible areaCheck whether the text and artwork you want to keep visible fit inside the window opening
- 03Measure the display spaceConfirm the outer dimensions of the frame as well as the space needed to swap items in and out
- 04Read the weight and mounting instructionsMatch the guidelines for your mounting surface and hanging hardware against the combined weight including the artwork
Source: The Oshi Lab's summary of how to read official specifications
For Fabric Tapestries, Check the Construction Even When the Size Name Matches
A concrete example of fabric merchandise is COSPA’s “Hatsune Miku NT B2 Tapestry” (in Japanese). Its official specifications list approximately 72.8 × 51.5 cm in rare suede (polyester). Even when a tapestry carries the same standard size label as a paper poster, its material and hanging structure are not necessarily the same.
If a product comes with rods and a hanging cord, check how much width and height are needed once assembled, in addition to the actual dimensions of the cloth. Where the artwork starts on the wall also shifts depending on where you hang the cord. Look closely at the product photos to tell whether the listed dimensions refer only to the fabric or include the attached hardware.
If you want to place a tapestry inside a frame made for paper, individually verify the thickness of the fabric, the seams, which parts can be removed, and the interior clearance of the frame. Rather than assuming it will fit as-is just because the size label matches, you can also check with the seller to see whether it can be housed without damaging the item.
Even if creases from folding bother you, read the product’s care instructions before deciding on your own to try ironing or washing it. Knowing the material name “polyester” alone does not tell you the safe care method for that specific print process and stitching.
Paper Posters
- Check the actual paper dimensions and the thickness the frame accepts
- See how much of the edge is hidden by the rim or mat board
- Prepare a workspace for swapping prints and a case for storing them
Fabric Tapestries
- Check the overall dimensions including both the fabric and attached hardware
- Read how the cord and rods are constructed and whether they can be detached
- Follow the product's care instructions when handling creases or dirt
Source: The Oshi Lab's summary of verification points from this article
Choosing Between Wall Mounting, Shelves, and Stands
Whether you are allowed to make holes in a rental apartment or event venue depends on your lease or the facility’s rules, so check those guidelines first. When hanging an item on a wall, read the compatibility between your wall material and the fasteners, the installation steps, and the supported weight limit before choosing hardware. Even if a paper poster itself feels light, you need to account separately for the combined weight once the frame and clear front panel are added.
Adhesive hooks and tension rods also have specific usage conditions, such as compatible surface types and installation spans. Read the instructions for every product you combine, and do not guess the weight capacity from the product name alone. If you hang additional items over time, review the total weight placed on a single rod or a single hook.
When mounting directly to a wall is difficult, compatible poster stands, frame easels, or the top of a shelf become practical alternatives. Even then, check the footprint required, the conditions needed for stable support, and the walking clearance around the area. Do not assume that avoiding wall mounting automatically means an item cannot fall or tip over.
If you consider taping paper directly to a surface, think ahead about whether both the paper and the wall can be returned to their original condition when the tape is removed. The name “masking tape” alone does not guarantee that no residue or damage will be left on wallpaper or a printed surface. Read the precautions for both the adhesive product and the surface it touches, and for a print you do not want adhesive contacting directly, consider using a frame or compatible display supplies instead.
Thinking About Light, Care, and Rotating Displays Together
When choosing a display spot, look not only at how much space you have, but also at how sunlight enters the room. Even a wall that stays in shade during the morning may receive direct sunlight at another time of day. Observe the windows, indoor lighting, and how the room is used throughout the day when picking a place for long-term display.
Some frames come with UV-cut clear panels, but that label does not guarantee colors will never fade. Check the product’s stated performance and usage conditions, and think about placement alongside those specs. Be careful not to take a UV blocking percentage or an estimated lifespan from one product and assume it applies directly to another product with different specifications.
When the number of items you want to display grows, you do not have to hang all of them on the wall at the same time. Rotating your display to match live shows or a character’s or performer’s birthday month is another enjoyable approach. Keeping a quick photo log of when and what you displayed gives you a handy reference the next time you choose what to put up.
Before swapping an item out, clear a flat space for the piece you are taking down and have its storage supplies ready. Work in an order that keeps you from hastily folding paper to hold it down or forcing fabric hardware to bend. Choose whether to roll, fold, or store an item flat based on the item’s condition and its official care instructions.
Putting a poster or tapestry into a sleeve or tube does not mean you never have to check on it again. Set up your storage so you can periodically check for humidity in the storage area and make sure other merchandise is not pressing down on the item. For broader room organization ideas, see Fan Merchandise Storage Ideas.
The Oshi Lab Note: Pairing Artwork Photos with the Information Needed to Display Them
What merchandise planners should prepare for a product page is not only a large, appealing image of the artwork, but also the physical dimensions needed to display it in a room. When buyers know the standard size name, the actual vertical and horizontal measurements, the materials, the included hardware, and the overall size once assembled for hanging, they can compare the item directly against the frames and wall space they already have at home.
For designs intended to be framed, planners can also check during prototyping whether lettering and credits near the edges remain visible. Rather than setting a single universal margin for every artwork based on one particular frame’s window opening, compare full-scale test prints against the actual display supplies buyers are likely to use. Product photos can show not only the outer rim of a frame, but also how the window opening or mat board overlaps the edges of the print.
Planners can also think through how the item will be handled after delivery—such as whether the shipping packaging can double as long-term storage, or whether adding a label on the outside helps buyers identify the artwork without unrolling it. Giving buyers the measurements and specifications they need to hang, stand, or rotate their collection—without forcing a single display method on them—is an essential part of planning large-format fan merchandise.
For inquiries regarding fan merchandise planning and retail design, please contact KAZAORI Inc. (in Japanese). Related articles: Fan Merchandise Storage Ideas / What Is an Oshi Altar (Saidan)? / Oshi Birthday Decorations / Oshikatsu × 100-Yen Shops and Everyday Goods
FAQ
When choosing a frame, is it enough to check only the size of the artwork?
In addition to the dimensions of the paper you want to put inside, check the outer dimensions of the frame, the window opening size that leaves the artwork visible, and the thickness and weight. Even among frames labeled for A3, the wall space required and the area hidden around the edges differ from product to product.
If a fabric tapestry is labeled B2, will it fit into a frame made for paper?
Even when the standard size name is the same, thickness, seams, attached hardware, and the storage capacity of the frame itself are different. Check the actual dimensions and construction of the fabric item individually, and read the product instructions before forcing rods off or pushing the fabric into a frame.
Does a UV-cut specification completely prevent fading?
That label alone does not guarantee the item will never fade. Read the product's performance specifications and usage conditions, observe how sunlight and indoor lighting hit the space, and choose your display spot accordingly.
Does masking tape leave no residue or marks on walls or paper?
You cannot say for sure that it will never leave a mark. Read the warnings for both the adhesive and the surface you are applying it to, and for items you do not want adhesive touching directly, consider using a frame or compatible display supplies instead.
What information should product planners include on a merchandise page?
Include the standard size name, actual vertical and horizontal measurements, materials, included hardware, and the overall size once assembled for hanging. When framing is expected, planners can also test with full-scale prints and the intended display supplies to check whether text and credits near the edges remain visible.


